Are you experiencing the frustration of losing important files stored on your Mac hard drive? The data loss may caused by various reasons. For instance, you may have formatted the Mac hard drive without backing up important files stored on it. Or perhaps while you are editing a document, the system suddenly crashes so that you can’t save the content you created.
But don’t worry — Mac hard drive recovery is often possible. In this blog, we will offer you 6 effective ways to recover data from Mac hard drives. Choose the most suitable method that suits your situation.
Overview of Mac Hard Drive Recovery
When important personal and business files become inaccessible due to damage to your hard drive, it can be frustrating as you deploy different measures to get them back. Luckily, there are different ways to recover your MacBook hard drive, depending on the cause of the loss.
Below are some of the common causes of data loss and Mac hard drive recovery solutions:
| Causes | Description & Solution |
| 🗑️ Accidental Deletion | Mac users can accidentally delete important files from their hard drives, only to realize their mistakes much later. Data loss due to accidental deletion can be recovered using “Disk Utility”. |
| 👾 Software Corruption or Malware | Malware and virus attacks can cause data loss and an effective MacBook hard drive recovery is through data recovery software. |
| 💻 Sudden System Crash or Hardware Failure | Hardware Failure caused by physical damage can be resolved using Mac “Terminal” or “Time Machine”. |
| 🗃️ Hard Drive Formatting | When you format a Mac hard drive, the file system structure will be deleted. As a result, the data on it will become inaccessible. |
Method 1. Recover Files from Mac Hard Drive via Disk Utility
The Disk Utility is a program built into the Mac operating system to help you manage both internal and external storage devices. You can also create a new disk image, partition your disk storage, and repair your disk in case of any damage.
Although Disk Utility is not designed as a dedicated Mac data recovery tool, it can fix many disk errors to make the Mac data recovery possible. Take its “First Aid” feature as an example, this tool can repair file system corruption to restore access to the files which means you can get them back.
In addition to that, Disk Utility also supports recovering data in other ways, such as creating disk images and mounting unreadable disks.
💡 The following tutorial will guide you through one of the solutions to hard drive recovery on a Mac.
Step 1. Go to the Disk Utility app on your Mac. (You can do this by using “Spotlight Search” or searching manually.
1️⃣ Press the “Command and Spacebar button” simultaneously to open the Spotlight search and type in “Disk Utility” to open.
2️⃣ Open up the “Finder” window. Click on the “Utilities” folder, and on “Disk Utility”.
Step 2. Choose the volume of storage you would like to restore on the sidebar.
Step 3. Press “Restore”, and then choose the volume from which you need to restore the erased hard drive.
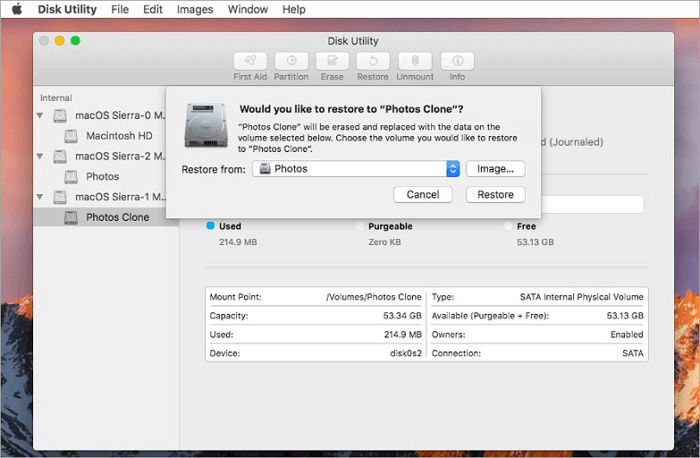
Step 4. Click “Restore” > “Done” to complete the recovery process.
📑 Note: When you restore a hard drive via Disk Utility, the entire content on the drive will be replaced with the backup/restored content. If you own any files on the drive, before restoring them, copy them to a safe, external device.
Method 2. Retrieve Files from Mac Hard Drive Using Time Machine
Time Machine, the backup mechanism of macOS, can be used as failsafe software to recover missing files easily. In addition to the fact that Time Machine is free to use and does not require a download, it has many other advantages.
Time Machine operates in incremental backup mode so that it can only save the changes after the initial backup. The interval between backups is customizable, it can be a week, a day, or an hour. As each backup generates a new recovery point, it will be efficient to find the previous version that you need to restore and get back lost files in Mac hard drive.
💡 Here’s how to recover files from Mac hard drives using Time Machine:
Step 1. On your Mac, open a Finder window, then type “Time Machine” on the search bar or simply click on the “Time Machine” icon on the topmost corner of your Mac.
Step 2. If the Time Machine icon is not in the menu bar, simply visit the Apple Menu and select System Settings. Click on the control center in the sidebar and across to Time Machine. Then, select “Show in Menu Bar.”
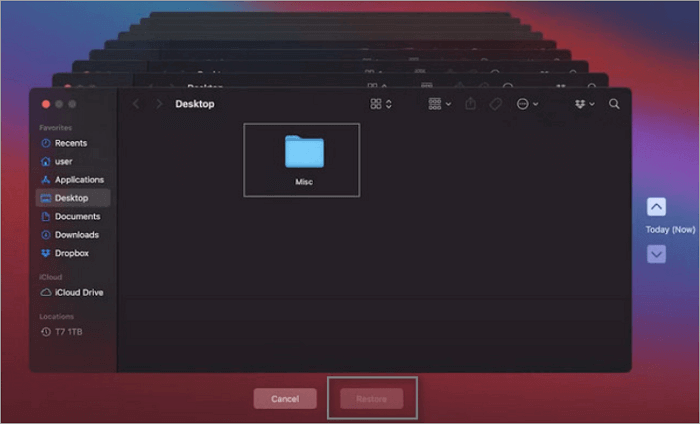
Step 3. Browse the Time Machine backup for the file(s) you would like to recover. You can search the dates, times, or even file location.

Step 4. Select the item(s), which can include a single file, folder, or an entire disk.
Step 5. Click “Restore” to return the file to its original location.
This method is convenient but it has also some limitations. To be more specific, if the last backup was a while ago, you might not recover the most recent files. And that is why it’s important to get into the habit of backing up your data regularly.
📌 The following blog will offer you the detailed steps to back up files using Time Machine:
Method 3. Recover Data from Mac Hard Drive with Third-Party Software
ONEREOCVERY is a powerful and versatile recovery software for macOS. The application of this software is very wide, it’s always helpful whether you need to retrieve files that are stored on internal or external hard drives. In addition to the Mac hard drive recovery, ONERECOVERY also supports getting back files that are stored on many other storage devices, including memory cards, flash drives, and even more.
ONERECOVERY supports recovering hard drives of different Mac models including macOS Sonoma, macOS Ventura, etc., with M1, M2 & T2 chips. Unlike data recovery tools that have limited use cases, ONERECOVERY is able to solve data loss in various situations, including restoring data from dead MacBooks or formatted hard drives.

💡 Here’s how to retrieve files from Mac hard drives:
Step 1. Download and install the ONERECOVERY software recovery tool for Mac.
Step 2. Launch the software on your Mac Finder or Launchpad.
Step 3. Select the Mac hard drive you would like to recover.
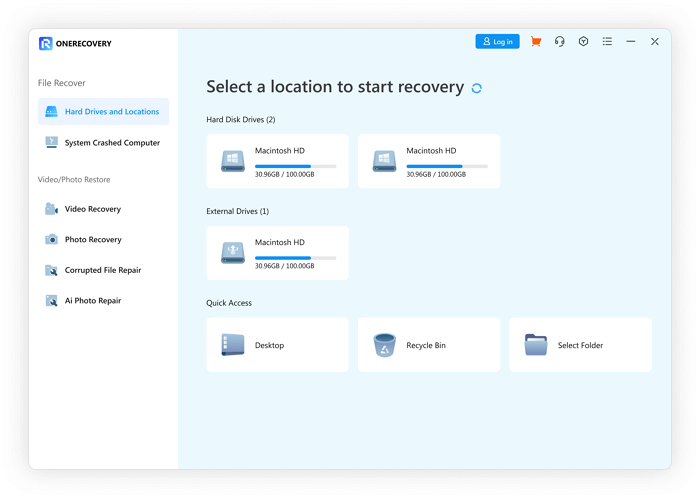
Step 4. Click “Search” at the right bottom and wait for the system to start scanning.
Step 5. Preview the files and select the files of your choice. Then, press the “Recover” button to get them back to your Mac hard drive.
Method 4. Use Terminal for MacBook Hard Drive Recovery
The Mac Terminal is a command-line emulator on all macOS systems to navigate through the computer easily and make specific changes. It can help open applications and recover deleted files. With a similar emulator to MS-DOS or UNIX operating systems, operating macOS is easy.
💡 Here’s how to recover data from a Mac hard drive using the Mac Terminal:
Step 1. Open the Mac Terminal using the Spotlight feature or through Finder. You can also use the Mac Launchpad to do this.
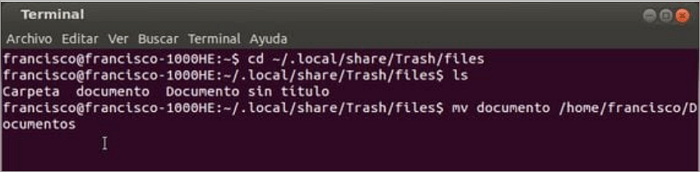
Step 2. Type the following command “cd .Trash” , then click on Return.
Step 3. Type ls -al ~/.Trash (this will help you view the content in your Trash folder.
Step 4. If you’ve located the file(s) of your choice, type mv filename ../ and hit Return again. (Ensure you type the full filename(s) correctly)
Step 5. Click “Quit” to exit the Mac Terminal.
Moreover, this solution is also useful when it’s necessary to recover files from an external hard drive on a Mac.
Method 5. Restore Mac Hard Drive Data from the iCloud
We have talked about how to retrieve files from a Mac hard drive with Time Machine, the built-in backup program provided by macOS. Besides that, Mac also offers you another feature to backup and restore files, which is iCloud.
As iCloud can automatically sync files across devices, you can use it to back up and restore your precious photos, videos, and documents in simple clicks. But it’s worth noting that iCloud only provides 5 GB of free storage so you need to clean up files that are no longer needed.
💡 Follow these steps to recover Mac hard drive data from iCloud:
Step 1. Log into your iCloud on your Mac.
Step 2. Click on your profile and choose “Settings”.
Step 3. Select Data Recovery and go to the data categories.
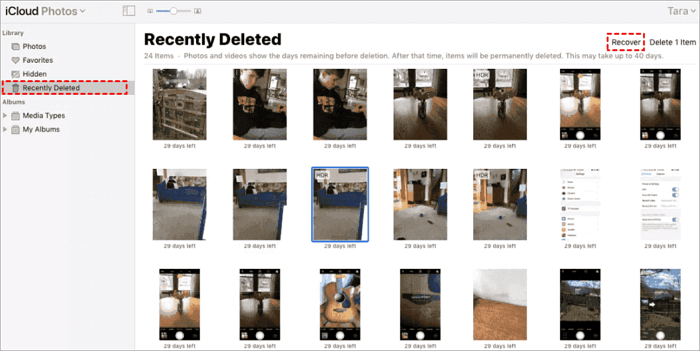
Step 4. Choose the files you would like to recover.
Step 5. Then click “Restore” and wait until it is restored.
Method 6. Use Professional MacBook Hard Drive Recovery Service
We have talked about many solutions to hard drive recovery on Mac, but using these methods usually requires some preconditions. For instance, you need to make sure you have the correct version of the backup of the lost files and that there is no physical damage to your hard drive.
If you try to recover data on a Mac hard drive with physical damage by yourself, the situation might get worse. The best solution to the damaged hard drive is professional data recovery services as they have a cleanroom environment where they can safely open and repair the drive.
Conclusion
Losing your essential files on your Mac can be heart-breaking, however, numerous tools can allow you to restore them. These tools range from software recovery tools like ONERECOVERY, external backups, Mac Terminals, and more. If none of these procedures work, you can reach out for professional assistance and send your laptop to a registered Apple repair store anywhere near you.